In brief
- Running machine learning (ML) algorithms and neural networks (NNs) on AMD GPUs has long been a non-trivial task for the typical developer. But the latest AMD ROCm release introduced a number of new features and improvements to ease the work of ML engineers
- As part of our research work, we decided to try running our ML inference on AMD GPUs. In this article, we share our journey about how we applied new ML approaches in our project and used those to run ML models with AMD
- The core project idea was to implement a smart interior editor that would allow users to change their room layout and design in just a few clicks. Read on to find out how we built the models with PyTorch and ran the code with little additional porting work
In the past, running ML algorithms and neural networks on AMD GPUs was a non-trivial task for the ordinary developer. As part of the GEMS AI/ML team at Zoreza Global, we spend a lot of time working on computer vision and machine learning algorithms. Among other projects, we do internal research and development for AMD — one of our biggest customers.
Our close collaboration with AMD provides us with early access to versatile AMD video cards that we use in our research work. Compared to competing hardware, AMD GPUs have numerous significant advantages in floating-point calculations. And what is more, the latest release of the AMD ROCm™ open software platform introduced support for new features and offered a great number of improvements to ease the work of ML engineers.
This is why, at some point, we decided to try running our ML inference on AMD GPUs. In this article, we want to share our journey about how we applied new ML approaches in our project and used them to run ML models with AMD.
Challenge for room layout editing
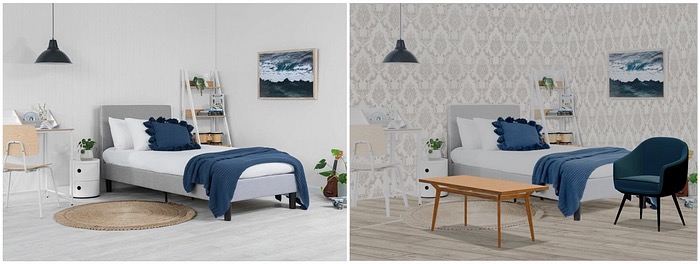
The core idea for our latest large project was implementing a smart interior editor that would allow users to change their room layout and design in just a couple of clicks. At a fundamental level, we needed to automate the following processes: Performing image segmentation, finding frame perspective, determining room geometry, removing objects within the frame and adding new 3D models. Additionally, we needed to develop an algorithm that would apply new material textures with light and shade effects.
Solution brief
After studying the subject area and running the first tests, we came up with the following pipeline for our smart editor:
- First, we should determine the parameters of the room: Consider the segmentation mask, layout mask (room geometry) and vanishing points (room perspective)
- Next, we should find individual objects on the segmentation mask for subsequent removal
- Then we can remove existing objects
- After that, we need to apply new textures, materials to the floor and walls
- Our next step is transferring shadows from the original image and applying them
- And finally, we can calibrate the 3D camera by the vanishing point and add new objects
To implement this pipeline, we used machine learning models. In the following portion of the article, we will describe our network in more detail.
1. Machine learning algorithms
1.1 Segmentation
Segmentation is a well-studied task, so there are a great number of canned solutions. To compare models for segmentation, we used the mmseg framework. It includes a great number of models for segmentation and weights for various datasets.
For training and testing models, we used the configuration file approach. This approach allowed us to unify work with different models and datasets. We chose the ADE20K dataset because it contains the largest number of indoor scenes available in open source.
As a model for segmentation, we chose the Swin-Transformer, introduced in 2021. The transformer’s architecture has shown good results on natural language processing (NLP) tasks, and it is also good for processing images. Our tests on the floor class showed an accuracy of 77.8%.

1.2 Room layout
To replace the wall texture, it was necessary to split the wall segmentation mask into segments and determine the wall type (front, left or right), since the perspective depended on it. We did this using the layout model. This stage was actually a bottleneck because the model often made mistakes. To reduce the amount of these mistakes, we tried all the models available in the open-source domain, and finally decided on lsun-room.

The architecture of the model was similar to the segmentation model. For a better result, the authors used an adaptive edge penalty in the loss function, which penalized the model for distorted edges.

1.3 Vanishing points
The perspective algorithm was based on finding vanishing points on the image plane. These are the points at which receding parallel lines seem to be meeting when represented in the linear perspective.

To search for vanishing points, we tried several algorithms. For example, XiaohuLuVPDetection detects lines in the image, and then clusters these lines to get three points. However, the problem of false lines still exists, which often results in poor quality. So we decided to use an algorithm based on the neurvps neural network.

lu-vp-detect / neurvps
The diagram below illustrates the overall structure of the NeurVPS network. Taking an image and a vanishing point as the input, the network predicts the probability of a candidate being near a ground-truth vanishing point.
The network has two parts: a backbone feature extraction network and a conic convolution sub-network. The backbone is a conventional convolutional neural network (CNN) that extracts semantic features from images.

On the inference, we had the following algorithm:
First, sample N points on the unit sphere and calculate their likelihoods of being the line direction of a vanishing point using the trained neural network classifier. Then pick the top K candidates and sample other N points around each of their neighbors. This step is repeated until we reach the desired resolution.
The following figure shows unit spheres with candidates. The algorithm gives a good result within three iterations.

1.4 Object removal
To delete objects, at first, we simply replaced them with a new texture. However, there was a problem with shadows, since we could not apply shadows to the objects from the original image.

So we started looking for other algorithms and finally found LaMa. It allows you to highlight objects that need to be removed with a mask and replaces them with a background.

2. Algorithm
2.1 Texture transfer
Now let’s take a closer look at the algorithm for replacing the surface material using the models described in the previous part.
At this point, we have found the vanishing points, and now we can apply lines from these points to the floor area to find the bounding lines from each point. We need four points of the line intersections. Now, knowing these points, we feed them to the input of the function that will create a transformation matrix for the texture.
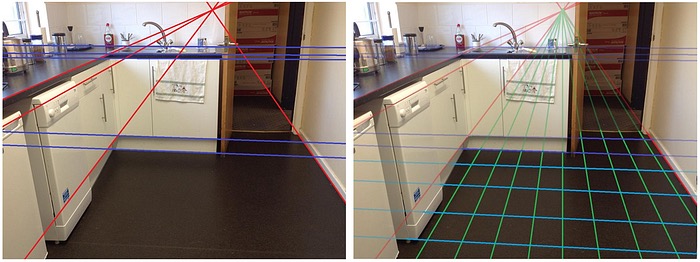
Now we can apply the transformation to the texture. In Perspective Transformation, we need to provide the points on the image from which we want to gather information by changing the perspective. We also need to provide the points inside which we calculated on the previous step. We get the 3×3 matrix of a perspective transformation with cv2.getPerspectiveTransform.
At the next step, we apply the resulting transformation matrix to the texture using the cv2.warpPerspective function.
And finally, we cut off the excess area using the segmentation mask.

The wall material is replaced for each wall segment independently:
- On the segmentation mask, we separate the wall segment obtained from the layout mask
- We choose the desired vanishing points, depending on the wall type (left, front, right)
- The texture replacement procedure is similar to the one used for the floor
2.2 Shadow transfer
To make the new floor texture realistic, we need to apply shadows and lights from the original image. To do this, we first get the floor using a segmentation mask and convert the image to grayscale. Then we apply a blur to remove the texture of the floor and keep only the shadows and lights.

Using the resulting image, we build a histogram and find the most common shade of gray. We believe that this is the real color of the floor.

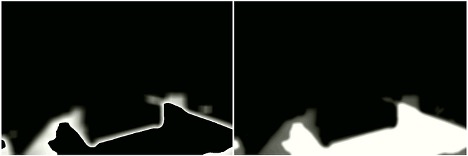
Now we can find the threshold of dark and light areas on the floor. We will assume that a decrease in brightness by 1.5 times will be a shadow, and an increase will be light. We get masks of light and shadow. The figure on the left shows an example of a shadow mask.
As you can see, we got too sharp an edge, so we need to apply the blur again. To do this, we fill the dark areas inside the floor with the maximum brightness value and apply a blur. For the light mask, the algorithm is the same, but we do not fill in the dark areas.
We can now apply masks to the target image.
First, we will apply a shadow mask. To do this, we convert the shadow mask from grey to RGBA. Next, we put zero in the alpha channel if the pixel is not a shadow. And blend with the original image using the multiply blend mode. For a light mask, the algorithm is the same.

2.1 Adding 3D objects
To add new objects, we used the Three library.js. Its functionality is similar to conventional 3D editors: adding background, 3D camera, light, 3D objects.
To add 3D objects to an image, we used the following approach:
- Create a scene
- Add an image to the background
- Calibrate the 3D camera for images, to preserve the perspective
- Add a light source
- Add 3D objects from the user
Using the above algorithm, we faced difficulties in calibrating the camera, since it required additional parameters. In the end, we successfully automated this stage.
We didn’t find a canned solution for camera calibration, so we had to do it ourselves. After researching camera calibration methods, we found the fspy application. This application allows users to manually set parallel lines, and then export the camera parameters.
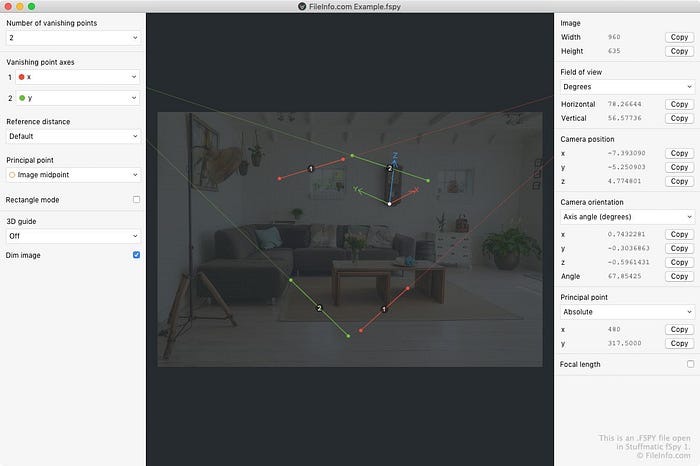
We managed to find out how the algorithm for calculating camera parameters works, using vanishing points. Since we could calculate the points automatically from the image, user participation was no longer required.

Bringing all the pieces together, we achieved the following results for the interior redesign.

Running ML inference with AMD GPU and ROCm
As we mentioned earlier in the article, we had decided to try running our ML inference on AMD GPUs. The following section of this article goes into some detail about that journey and how using AMD’s GPUs as well as their new ROCm capabilities made this ML application for room layout editing far more approachable and achievable.
System configuration
Our test environment included a single PC with the following configuration:
- AMD Ryzen 7
- Vega 20 [Radeon VII]
- Ubuntu 20.04
1. Installing required libraries
In Firstly, we installed the ROCm v5.2 library following the official instructions:
sudo apt-get update
wget https://repo.radeon.com/amdgpu-install/22.20/ubuntu/focal/amdgpu-install_22.20.50200-1_all.deb
sudo apt-get install ./amdgpu-install_22.20.50200–1_all.deb
sudo apt-get update
sudo amdgpu-install - usecase=rocm
sudo reboot
Next, we installed PyTorch as described in their documentation.
We planned to deploy everything in a Docker container. So, we chose a Docker with pre-installed ROCm libraries and the required version of PyTorch from the official ROCm Docker Hub.
To start the Docker, we followed these steps:
1. Got the image with the required torch=1.11 version from the ROCm Docker hub:
docker pull rocm/pytorch:rocm5.2_ubuntu20.04_py3.7_pytorch_1.11.0
Unlike NVIDIA and CUDA, ROCm did not require us to install additional plug-ins for Docker.
2. After confirming the correctness of the Docker image, we created a custom Docker file inside the project:
FROM rocm/pytorch:rocm5.2_ubuntu20.04_py3.7_pytorch_1.11.0
ARG APP_DIR=/app
WORKDIR "$APP_DIR"
COPY . $APP_DIR/
3. Next, we built and started a Docker container using the following command:
sudo docker run -it --cap-add=SYS_PTRACE --security-opt seccomp=unconfined --device=/dev/kfd --device=/dev/dri --group-add video --ipc=host --shm-size 8G my_project/rocm
2. Testing models with AMD graphics cards
Now that we had the necessary environment, we were able to load the models and run the inference. For the most part, the process was quite straightforward and smooth. You can find a brief report with our test results, below.
2.1 Vanishing points model
- Model source: https://github.com/zhou13/neurvps
- Details: The model uses a custom Deformable Convolution layer loaded via torch.utils.cpp_extension
- Status: [Success]
The model is successfully initialized with the weights loaded. Forward pass does not raise an error
2.2 Object removal model
- Model source: https://github.com/saic-mdal/lama
- Details: The model uses default torch layers
- Status: [Success]
The model is successfully initialized with the weights loaded. Forward pass does not raise an error
2.3 Room layout model
- Model source: https://github.com/leVirve/lsun-room
- Details: The model uses default torch layers
- Status: [Success]
The model is successfully initialized with the weights loaded. Forward pass does not raise an error
2.4 Segmentation model
- Model source: https://github.com/open-mmlab/mmsegmentation [Success]
- Details: We used the SWIN transformer architecture, which showed the best results on indoor segmentation. This model is based on the mmcv framework (3.7k stars) from open-mmlab
The major mmcv features:
- Various backbones and pre-trained models
- Bag of training tricks
- Large-scale training configs
- High efficiency and extensibility
- Powerful toolkits
- Status: [Success]
This model was the hardest task of all because of mmcv
There are two known ways to install mmcv:
- Building mmcv from source. This approach caused an error:
File "/opt/conda/lib/python3.7/site-packages/torch/utils/cpp_extension.py", line 566, in unix_wrap_ninja_compilewith_cuda=with_cuda)File "/opt/conda/lib/python3.7/site-packages/torch/utils/cpp_extension.py", line 1418, in _write_ninja_file_and_compile_objectserror_prefix='Error compiling objects for extension')File "/opt/conda/lib/python3.7/site-packages/torch/utils/cpp_extension.py", line 1747, in _run_ninja_buildraise RuntimeError(message) from eRuntimeError: Error compiling objects for extension
- Installing pre-built mmcv packages built for a specified CUDA version or CPU only
Since this was the only option left, we decided to use a TorchScript on a PC with CUDA libraries. TorchScript is a good solution for creating serializable and optimizable models from PyTorch code. Any TorchScript can be saved from a Python process and then loaded into a process where there is no Python dependency.
So, we ended up with an approach that would allow us to port the model code from one PC to another. First, we initialized the model on a PC with an NVIDIA GPU. Next, we generated the model code using torch.jit.trace. And after that, we uploaded the code to the PC with ROCm, so there was no need to install mmcv.
As a result of our tests, the model was successfully initialized. Forward pass did not raise an error and was the same as on a PC with CUDA.
Summary
Our research proved that ROCm library covers all the needs for running ML models on AMD GPUs. The standard and custom layers of the PyTorch framework work with no additional changes, which allows experimenting with models and deploying them.
Of course, there’s no single solution for all cases, as each project and each model has its own merits. Even though the mmcv framework does not yet include support for ROCm and we faced some difficulties with it, there’re still ways to successfully circumvent these limitations and get the models running.


